Adding a Printer with Self Service (preferred)

1) Open the Self Service App (Icon in Dock)
2) Login with your Active Directory credentials
3) Look on the right hand side of the window for the "Categories" list
4) Choose "Printers BBM"
5) Select the printer you'd wish to install
6) If your desired printer is not available, see the manual installation instructions below
2) Login with your Active Directory credentials
3) Look on the right hand side of the window for the "Categories" list
4) Choose "Printers BBM"
5) Select the printer you'd wish to install
6) If your desired printer is not available, see the manual installation instructions below
Adding a Printer Manually
1) Go to System Preferences (Gears Icon in Dock)
2) Select Print & Fax
3) Click on the "+" plus sign to add printer (the "-" can be used to remove a printer from your list)
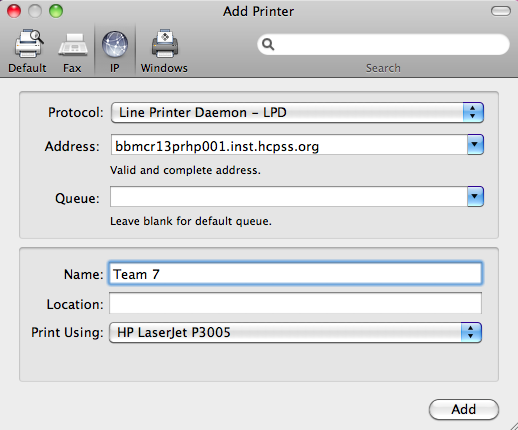
4) Click on the GLOBE icon for IP (NOT the default)
5) Type in the NEW Printer Name as listed below for your area where it says: Address (should say valid & complete address)
6) After the Printer Name add ".inst.hcpss.org" (ex. bbmcr05prhp001.inst.hcpss.org)
7) Change "Protocol" to "Line Printer Daemon - LPD"
7) The name should appear in the "Name" Section at the bottom of the page - wipe it out & put in friendly name (6thGr, Art Room, etc.)
8) Name the Location "Room Number" - Wherever it is (you have to type it in)
9) Click the "Add" button that the bottom
10) Click "Continue" when next screen comes up.
You should be set up and ready to print!
1) Go to System Preferences (Gears Icon in Dock)
2) Select Print & Fax
3) Click on the "+" plus sign to add printer (the "-" can be used to remove a printer from your list)
4) Click on the GLOBE icon for IP (NOT the default)
5) Type in the NEW Printer Name as listed below for your area where it says: Address (should say valid & complete address)
6) After the Printer Name add ".inst.hcpss.org" (ex. bbmcr05prhp001.inst.hcpss.org)
7) Change "Protocol" to "Line Printer Daemon - LPD"
7) The name should appear in the "Name" Section at the bottom of the page - wipe it out & put in friendly name (6thGr, Art Room, etc.)
8) Name the Location "Room Number" - Wherever it is (you have to type it in)
9) Click the "Add" button that the bottom
10) Click "Continue" when next screen comes up.
You should be set up and ready to print!
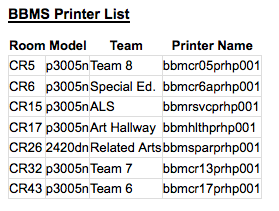
Type the new printer name plus add ".inst.hcpss.org"